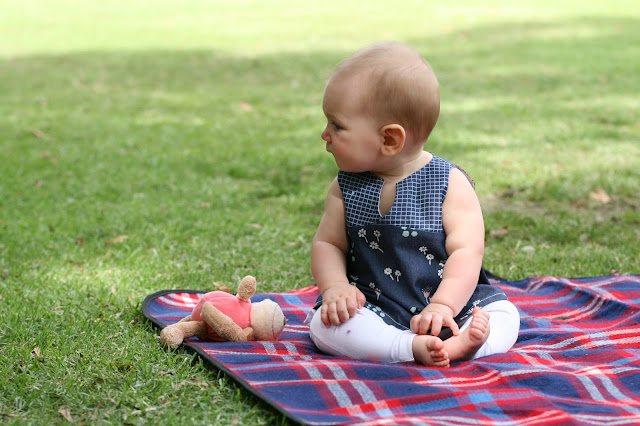
While she was sleeping, I treated my sweet baby L to something very special.
I made her a new tunic using the Naples dress pattern, the latest release from Jennuine Design.
Baby L's tunic is made from the most delicious denim from the Denim Studio line generously provided by Art Gallery Fabrics. It took me just about forever to choose fabric for this project. I decided to use Ditsy Abrasion for the skirt part of baby L's tunic. I fell in love with this print when I saw a jacket Laura made for her daughter. I think Bombazine Inspired that I used for the bodice compliments it very well. The fabric was an absolute delight to work with. Thank you AGF!
I used two of Jenn's patterns before. Miss R has been enjoying her Verona dress for a few moths, and recently I made a Satya romper for baby L. Both patterns were great and I would not hesitate to recommend them. However I must admit that when Jenn first introduced the Naples dress pattern I was not excited about it. It did not feel like my style, if you know what I mean. However the more photos of this pattern sewn by Jenn and her testers I saw, the more it looked attractive to me.
The Naples dress pattern has beautiful curves that give it such feminine feel. I love the shape of the cross over bodice. Jenn offers a number of various skirt and sleeve options. I decided to give this pattern a go and make it more 'me'. It was very easy to do.
To start with, I decided to omit bias tape finishes and lined the bodice instead. I simply added seam allowance to the front of the bodice and the neckline and cut two of each piece, one from denim and one from voile. Jenn gives brief but clear instructions on how to sew a lined bodice.
Babies and young children have larger heads in proportion to the rest of their bodies. Jenn designed the neckline to be snug fitting and offered a couple of clever ways to adjust the pattern to make sure babies heads fit through the neckline opening with ease.
Now, what is one thing that goes hand in hand with denim? Topstitching! Of course! I simply put two regular threads through one needle to mimic topstitching thread.
Being a mean mummy I took grass off her. Poor baby had no other choice but to try eat the flowers off her tunic! Yeah sweetie, life is so unfair...
Thank you for having me on tour Jenn. I said I was not super excited by this pattern when it was first introduced however I love it now! Thank you for putting a lot of time and effort into making such high quality pattern. Everything lines up perfectly. Your instructions are amazingly detailed. The Naples dress pattern turned out to be easily customised. I could not be more pleased with the final result. Thank you Jenn.
If you would like to see more version of this pattern please visit other blog tour participants:
3/21: A Jennuine Life * My Sweet Sunshine * Chelise Patterson
3/22: Rock the Stitch * Taylor Made Creates * Élégantine!
3/23: Handcrafted by RED * Lily Shine * Pattern Revolution * Sew Sophie Lynn
3/24: Sew Shelly Sew * 2 Little Hooligans * Handmade Boy
3/25: Filles à Maman * While She Was Sleeping * That's-Sew-Kari * Czarina's Project
Until the 27th of March you can save 25% off Jennuine Design patterns (excl. bundles) using code NAPLESTOUR. There is also an opportunity to win any three of Jenn's PDF patterns and a fat quarter bundle of Essentials II range of Art Gallery fabric.
* Jenn provided the pattern for free. I mean what I say about it.
** Art Gallery provided fabric for this post free of charge. I am afraid I am hooked on it!
*** Baby L did not consume too much grass during the photo shoot.


I'm so glad we got to see these pictures of adorable squishy baby L!! Thanks so much for your kind words and making a perfect personalized version of the pattern. I love the simple changes to make it unique!
ReplyDeleteI love your tunic and the changes you made to it are so perfectly you! The lining looks so pretty, and sleeveless - it has a completely different look! And I'm all for big buttons -- they are so fun for baby clothes! Can I use any more exclamation marks?! Obviously your post has got me all excited for this pattern! ;) Love it as always!
ReplyDeleteSo cute. I like the changes you made and the fabric you chose. The topstitching and buttons are so fun!
ReplyDeleteAdorable! That first photo is especially precious! I have this same denim waiting for me as well! It is lovely!
ReplyDeleteJust adorable, Jenya. Love the style and fabric. Little L. looks so cute and is growing up quickly.
ReplyDeleteThis is adorable, your version is gorgeous with those big buttons! Loooove! <3
ReplyDeleteThe button placket was a nice touch!
ReplyDeleteSo adorable!
ReplyDelete